The Camera Body
All of the newer photos on this
site were shot using a Canon EOS 1D Mark III camera, which is a
professional, 10 megapixel digital SLR. However, many of the
earlier photos were shot using the much more affordable Canon EOS 30D,
an 8 megapixel consumer-grade camera which Canon has recently upgraded
in the form of the 40D.
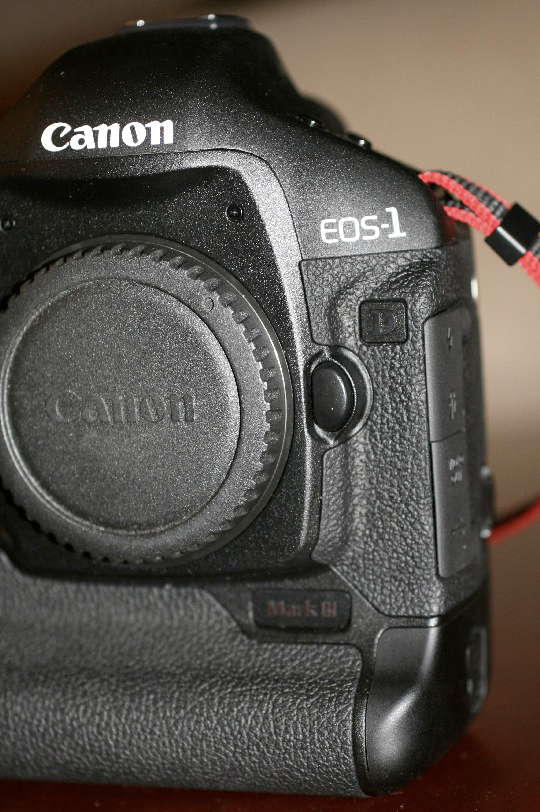
You can read my review of the 1D Mark III for more information on this pro body, or check out my review of the much more affordable Canon 40D.
The nice thing about SLR
cameras is that they accept interchangeable
lenses, so you're not stuck with a single lens that may in time
prove to be insufficient for the type of photography you want to
do. And they're not too hard to use, as long as you keep them in
"auto" mode, which effectively emulates the behavior of the cheaper
"point-and-shoot" cameras. After using them in auto mode you can begin
to experiment with the other modes until you begin to feel comfortable
programming the camera. I do most of my work in aperture-priority mode; in this
mode, the only thing I absolutely have to program is the aperture (which I typically set
to the maximum for the lens I'm using, unless I need to increase the depth-of-field). Other optional
settings
which I sometimes fiddle with are the exposure
compensation and ISO setting,
though I only mess with these when light is scarce and I need to
increase the shutter speed in order to mitigate the effects of
hand-shake.
The above models all use
CompactFlash memory cards; I keep 60
Gigabytes worth of
memory cards with me at all times, and I've yet to run out of memory in
the field. I shoot in RAW mode because it retains the most amount of
information. RAW is especially useful for reducing noise (i.e.,
the "speckling" you see in areas of the image that should be smooth),
since noise reduction during RAW conversion tends to be more effective
than when applied to a converted JPEG.
I've used cards made by
SanDisk, Lexar, PNY, and Transcend. So far, the only one
that has failed was the Lexar (which was also the most expensive card,
by far) -- but they replaced it, and I've had no
problems since. I have a mix of 1 GB, 2 GB, and 8 GB cards, for a
total
of 60 GB. I keep these in my vest pocket (in a ziplock back for
protection from moisture), so they're always ready
when I need to swap out a card. I have my Canon 1D Mark III
set up to record RAW images to the CF card and JPEG-L "previews" to a
separate Secure Digital (SD) card; the "previews" on the SD card are
only used to verify after each shot that I've got the expore set right;
I delete all files from the SD card whenever I swap in a fresh CF card,
since the SD files are only for individual image review during
shooting. The JPEG previews are useful because the on-camera
preview from the RAW files is terrible.
<image>
An important selling point of
the Canon 30D and the Canon 1D Mark III cameras is the battery life
-- although I bought a backup battery for my 30D, I've never needed it,
even after
spending an entire day in the field, and so far I've never run out of
juice on my Mark III either. Compared to the battery in my old
Nikon D50, the Canon's battery never seems to run out of juice...
<image>
Telephoto Lenses
Most of the higher-quality bird
photos on this site were taken using
one of three lenses: the Canon 400mm f/5.6L USM "Toy Lens", the Canon
400mm
f/4.0 DO IS USM ("DODO") lens, or the Sigma 800mm f/5.6 EX APO DG HSM
("Sigmonster") lens. The first of these, the f/5.6, is shown below.
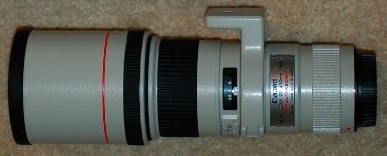
This lens has a well-deserved
reputation for being one of the sharpest
telephoto lenses ever made. I can personally attest to the sharpness of
this lens, which I believe derives from the use of fewer optical
elements in its construction than most other long telephoto lenses (7
in this lens, versus 17 for the larger, f/4.0 lens shown below). Fewer
optical elements result in fewer lens-to-lens and lens-to-air
transitions and
therefore fewer opportunities for light scatter, as well as
opportunities for
mis-alignment at the factory. Renowned bird photographer Arthur Morris
swears by this lens, especially for birds in flight and in bright
sunlight, and it has become extremely popular as a result. Not only is
the lens optically suberb, but it's also small and lightweight.
Because the 400mm f/5.6 lacks
image stabilization, and because it has a
maximum aperture of only f/5.6, I sometimes resort to the more powerful
400mm f/4.0 DO IS USM (my "DODO" lens -- "Diffractive Optics for
Digital Ornithology"), which is shown here attached to the Canon 30D:
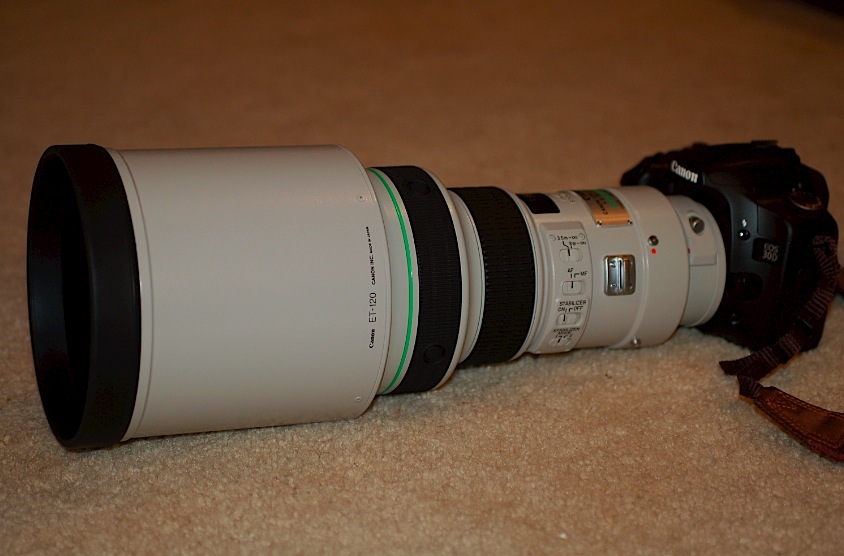
The image stabilization feature
sported by this lens definitely helps
to reduce the effects of hand shake when I use this lens without a
tripod. However, on sunny days I usually turn it off
altogether, since the bright sunlight allows me to use extremely high
shutter speeds, so that hand tremors tend not to be an issue.
Although the lens looks somewhat formidable in the above photo, it is
remarkably light -- just 4 lbs, which is less than the 300mm f/2.8L
Canon lens. The lightness is due to the use of diffractive optics (DO), a
relatively new technology which allows longer focal lengths in a
shorter (and lighter) package. Because of its lightness I almost never
use a tripod with
this lens except when operating it with the 2x teleconverter (see the
discussion of teleconverters below). Most recently I've been using it
almost exclusively with the 1.4x teleconverter, for an effective focal
length of 560mm at f/5.6; in this configuration I still hold the lens
in my hand rather than using a tripod, and find that it works very
well.
Since my new Canon 1D Mark III
is a "pro" body, I am now able to use the 2x teleconverter with this
lens and still retain autofocus capability, resulting in an AF 800mm
lens! This is an amazing focal length for a lightweight, handheld
setup. Unfortunately, my 2x TC is not very sharp, so I don't
currently use that setup very often.
For small birds at a distance,
400mm is simply not enough
firepower. For these situations I use the Sigma 800mm f/5.6 EX
APO DG HSM "Sigmonster":
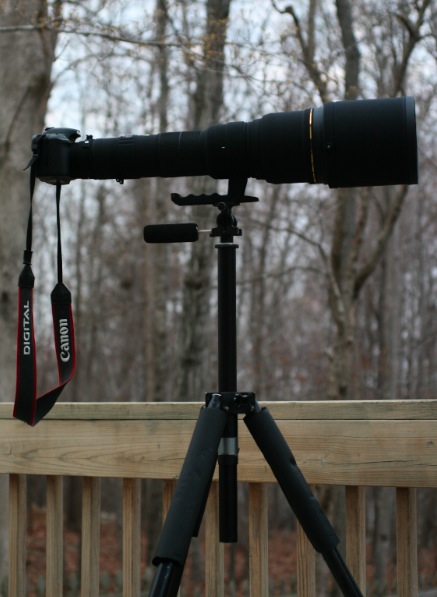
This lens is brutally
heavy. Hiking several miles with this thing
slung over my shoulder can be difficult. Nevertheless, for
photographing tiny warblers flitting around in the forest canopy, there
is no other viable solution than a big telephoto lens like this one.
Note that Canon does not make an 800mm lens, though one has been
announced for release this coming spring. The closest thing is the
Canon
EF 600mm f/4.0 IS USM, which is several thousand dollars more than the
Sigma 800mm, and requires a teleconverter to achieve a similar focal
length (840mm at f/5.6). The Sigmonster's build quality is quite good,
though I did have to send it in for service once, due to a loose
mounting ring.
Also,
this lens does not have image stabilization, which can be a significant
problem in windy conditions (keep in mind that the longer the focal
length, the worse a lens will perform in high wind!).
For subjects which are either
very close or relatively large, the 400mm
and 800mm lenses can be too powerful -- an example would be a lion in a
zoo at
close range. For these types of applications I keep a shorter zoom lens
in my vest pocket:
<image>
This is an 100-300mm zoom lens
with Canon's USM ("Ultrasonic Motor")
technology. The USM lenses supposedly have higher quality glass than
non-USM (Canon) lenses, and since the lens' auto-focusing motor is
built into the lens (rather than using the camera's focusing motor),
focusing tends to be very quick and accurate. In my older Nikon setup
(a Nikon D50 camera and Nikkor 80-400mm zoom lens), I found that
auto-focusing could be extremely painful due to the slowness of the
camera's focusing motor. My newer (Canon and Sigma) lenses all focus
very fast by comparison. Note that the zoom lens shown above does not
have image stabilization; image-stabilized zooms are available but are
more expensive, and I've gotten some excellent photos through this lens
despite the lack of image stabilization, and without a tripod.
This 300mm zoom is a relatively cheap one -- it goes for about $280 or so. Canon has another model which is rather more attractive: the 28-300mm f/4L IS USM zoom. I've yet to try out this latter beast, but it does appear quite useful, since at the 28mm range it acts as a wide-angle lens (which should be useful for landscapes) and it has both built-in Image Stabiliation (IS) and a 2.5-foot close-focusing distance, which might be useful for photographing flowers and butterflies. Too bad it costs about $1200 (US)! They also have a nice 300mm DO zoom lens, which appears to be extremely compact.
This 300mm zoom is a relatively cheap one -- it goes for about $280 or so. Canon has another model which is rather more attractive: the 28-300mm f/4L IS USM zoom. I've yet to try out this latter beast, but it does appear quite useful, since at the 28mm range it acts as a wide-angle lens (which should be useful for landscapes) and it has both built-in Image Stabiliation (IS) and a 2.5-foot close-focusing distance, which might be useful for photographing flowers and butterflies. Too bad it costs about $1200 (US)! They also have a nice 300mm DO zoom lens, which appears to be extremely compact.
Teleconverters
During my early days of bird
photography I made the mistake of relying
too heavily on teleconverters. In particular, I used a very cheap
teleconverter attached to a 400mm zoom lens, which was nearly always
zoomed out to 400mm, for a total effective focal length of 800mm. The
quality was very poor. The problem was that zooms tend not to be the
sharpest lenses, and cheap teleconverters tend not to be sharp either.
I now keep two teleconverters
with me at all times: the Canon
Extender EF 1.4x II, and the Canon Extender EF 2x II, both
top-of-the-line Canon products. The 1.4x
applies a factor of 1.4 to both the focal length and the aperture, so
that (for example) a 400mm f/4.0 lens becomes a 560mm f/5.6 lens. And
similarly for the 2x.
<image>
Both TC's degrade the image
quality, though depending on the scene it may be harder or easier to
actually see the degradation without specifically looking for it. I
have used the 1.4x attached to the 400mm f/4.0 lens for an effective
540mm f/5.6, hand-held, with very acceptable results when
image-stabilized, though the image is noticeably soft -- not unpleasantly so, but
just enough that you would notice if you were to compare the image to
others without the TC.
UPDATE: I recently replaced my 1.4x TC with
another "identical" unit of the same model, and the results have been
excellent; there is apparently much variation between units, even brand
new units. In any event, the 1.4x TC is now "permanently" attached to
my 400mm DO lens, and I am very satisfied with this setup. My 2x
still degrades the image quality too much, however, so I don't use
it. (Maybe I need to have it re-calibrated?)
<image>
The 2x TC has come in handy in
some special circumstances. When
photographing
an American Kestrel at the top of an extremely tall utility pole in
Raleigh, I stacked the 1.4x and 2x teleconverters onto my 800mm
Sigmonster lens,
for an effective focal length of 2240mm (!) at f/11. No current DSLR
will
auto-focus at f/11, so I had to manually focus in this configuration,
and
many of the shots were too blurry to keep. A few were reasonably sharp,
however (after digital processing on the computer), as you can see here.
External Flash
Until very recently, I used no
flash whatsoever -- I relied entirely on
natural lighting from the sun. This severely limited my opportunities
for bird photography, since birds are often encountered in shady places
like forests. Then I found that Art Morris relies heavily on
flash when photographing songbirds and shorebirds. Even when
there is ample sunlight, pro bird photographers often utilize some
flash to lighten up the shadows (called "fill flash").
I now keep an external flash
unit with me at all times -- the Canon
Speedlight 580 EX II. This is a ridiculously over-priced unit, in
my opinion (though it has recently come down in proce to about $350US),
but produces powerful flash output, and has been highly
recommended by other photographers. When using this unit I always
attach a Better Beamer flash extender, which utilizes a fresnel
magnifying lens to extend the range of the flash, which both increases
my flash range and also saves battery power.
<image>
Regarding battery power, it is
important to note that outdoor flash
photography eats batteries at an insane rate. Whenever I use my
flash unit (which is about 99% of the time) I always attach an external
battery pack ($140 US) to augment the
unit's internal juice -- a total of 12 AA-sized batteries usually lasts
all day but needs to be recharged overnight to renew power for the
next shoot. Without an external power supply, two bad things
happen: (1) the batteries in the flash unit die quickly, and, more
importantly (2) the recharge-time between shots can become quite long,
so that you have to wait 30 seconds or more between shots; this is
simply too long for bird photography.
I use 12 @ 2900-mAh AA batteries manufactured by Impact (purchased at Adorama) and 4 @ 2500-mAh batteries manufactured by Sony (purchased through Amazon). When buying rechargeable batteries for flash units you need to be careful to get a package which includes a high-quality charger; cheaper chargers can overcharge your batteries and reduce their lifespan.
I use 12 @ 2900-mAh AA batteries manufactured by Impact (purchased at Adorama) and 4 @ 2500-mAh batteries manufactured by Sony (purchased through Amazon). When buying rechargeable batteries for flash units you need to be careful to get a package which includes a high-quality charger; cheaper chargers can overcharge your batteries and reduce their lifespan.
<image>
Using an external flash is an
enormous pain. The flash unit,
fresnel extender, and external battery pack add weight to the lens
setup (sometimes causing the lens to inadvertently flop over in the
mounting ring if not properly secured), and often catches on branches
and foliage when walking through the woods with the setup slung over my
shoulder. Getting the amount of flash just right can also be an
enormous pain. When using flash I switch between
Aperture-Priority mode (in which case the flash unit is merely
providing "fill flash" to lighten up the shadows) and Manual Mode (in
which case I'm using the flash as the primary light source).
Canon's flash logic makes manual mode flash photography somewhat
manageable, however, by automatically adjusting the flash output so as
to achieve a desired exposure, so that "manual" mode isn't quite as
"manual" as it sounds (a good thing).
One trick I've learned with my
new EOS 1D Mark III is to not use the "high-speed synch" feature on my
Speedlight 580EX II flash unit, since (by some reports) that mode on
the pro bodies requires more manual intervention in setting the
exposure level correctly. For bird photography, since I'm
constantly switching between subjects, some of whom are backlit while
others are not, the high-speed synch mode is just too laborious on the
1D body. Fortunately, the 1D Mark III has a max synch speed (in
normal mode) of 1/300 sec, which has been fast enough for me.
Without the high-speed synch set, I've just needed to pay more attention to the blinking of the shutter speed in the viewfinder --- a blinking "300" indicates possible over-exposure. In these cases I either stop down from f/8 to f/11, or (if I'm already at f/11) reduce the ISO speed from 400 by several stops until the "300" stops blinking. So far I've been totally happy with a maximum shutter speed of 300; indeed, in cases where the bird's movement exceeded this shutter speed, I've found that the flash speed was sufficient to freeze (or nearly freeze) the birds' movement, with only a very subtle "movement shadow" evident in the resulting image from the slower shutter speed.
Without the high-speed synch set, I've just needed to pay more attention to the blinking of the shutter speed in the viewfinder --- a blinking "300" indicates possible over-exposure. In these cases I either stop down from f/8 to f/11, or (if I'm already at f/11) reduce the ISO speed from 400 by several stops until the "300" stops blinking. So far I've been totally happy with a maximum shutter speed of 300; indeed, in cases where the bird's movement exceeded this shutter speed, I've found that the flash speed was sufficient to freeze (or nearly freeze) the birds' movement, with only a very subtle "movement shadow" evident in the resulting image from the slower shutter speed.
Telescopes as Lenses
For birds at relatively large
distances I've had some luck in
using astronomical (!)
telescopes to act as cheap telescopic
lenses. I started out using the Celestron C-5 (the white telescope
shown below), which is of the Schmidt-Cassegrain design. This is an
amazing instrument, though somewhat fragile. I used my C-5 to
observe an eagle nest outside Washington, DC for 11 years; except for
the frequent collimation required to keep the instrument in pristine
working condition, this unit served my needs very well over those
years.
In what I call the "digiscoping
mode" this telescope can be used for
primitive long-range photography by simply placing the camera lens up
to the eyepiece of the telescope (shown at left in the illustration
below) and simply capturing the image that one would normally see if
one were to look into the telescope's eyepiece.
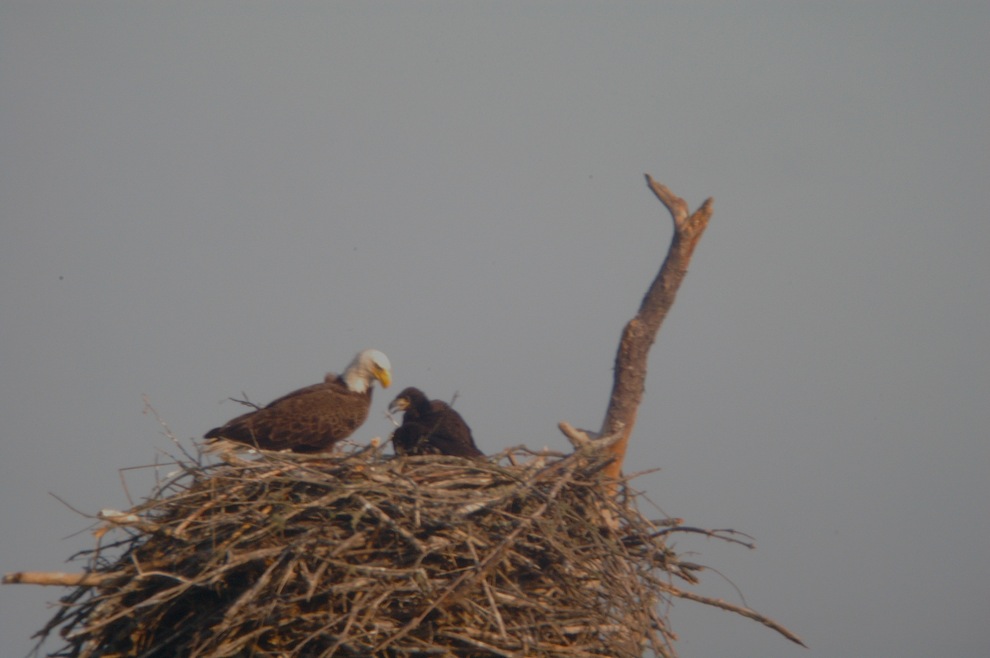
<image>
An example image captured in
this way through a Celestron C-5 is shown
below; this is an active eagle nest that I followed during the 2006
nesting season.
This is not a sharp
photo. Part of the reason for this is that the nest was about four football-field
lengths away from where I was standing! Another problem derives
from the use of "digiscoping" --- i.e., placing the camera's lens up to
the telescope's eyepiece and photographing the image manually. A far
better method is to attach the camera directly to the telescope's
optical tube assembly via a t-adapter
(shown below):
<image>
The t-adapter attaches to the
back of the telescope in place of the
eyepiece/diagonal assembly. You can then attach your camera (without
any lens mounted) to the t-adapter via a manufacturer-specific t-ring; a Nikon t-ring is shown
below:
<image>
With these three items---the
Celestron C-5 (about $600 new), the C-5's
t-adapter (about $50), and a t-ring for your particular camera model
(about $15), you can obtain pretty amazing photos, given the relatively
modest outlay of cash required. The reason this works better in
practice than standard "digiscoping" is that the light has far less
glass to travel through in reaching the camera's CCD sensor, since both
the telescope's diagonal/eyepiece assembly and the camera's lens have
been removed entirely. Less glass translates into straighter
light rays (statistically speaking) and thus sharper images.
An even better setup is one
utilizing the Orion 150mm
Maksutov-Cassegrain telescope (see below), which currently sells for
about the same price as the smaller C-5 ($600 direct from Orion).
Whereas the C-5 has a 5-inch objective lens diameter, the Orion is 6
inches, letting in far more light. Also, whereas the C-5 has a 1200mm
focal length, the Orion is 1800mm. Coupled with a 1.5x
crop-factor digital camera, the effective focal length is 2700mm (!).
<image>
Of course a telescopic lens of
this sort can't (normally) be held in the hand; I
mount mine on a Davis & Sanford (now manufactured by Tiffin)
telescope tripod, which I
believe fetches $200 or more (I got mine years ago for about $120, as I
recall). The image below shows the Orion attached to my DLSR and
mounted on the Tiffin tripod; I was using it that day to shoot Willets
and Marbled Godwits along the Outer Banks of North Carolina.

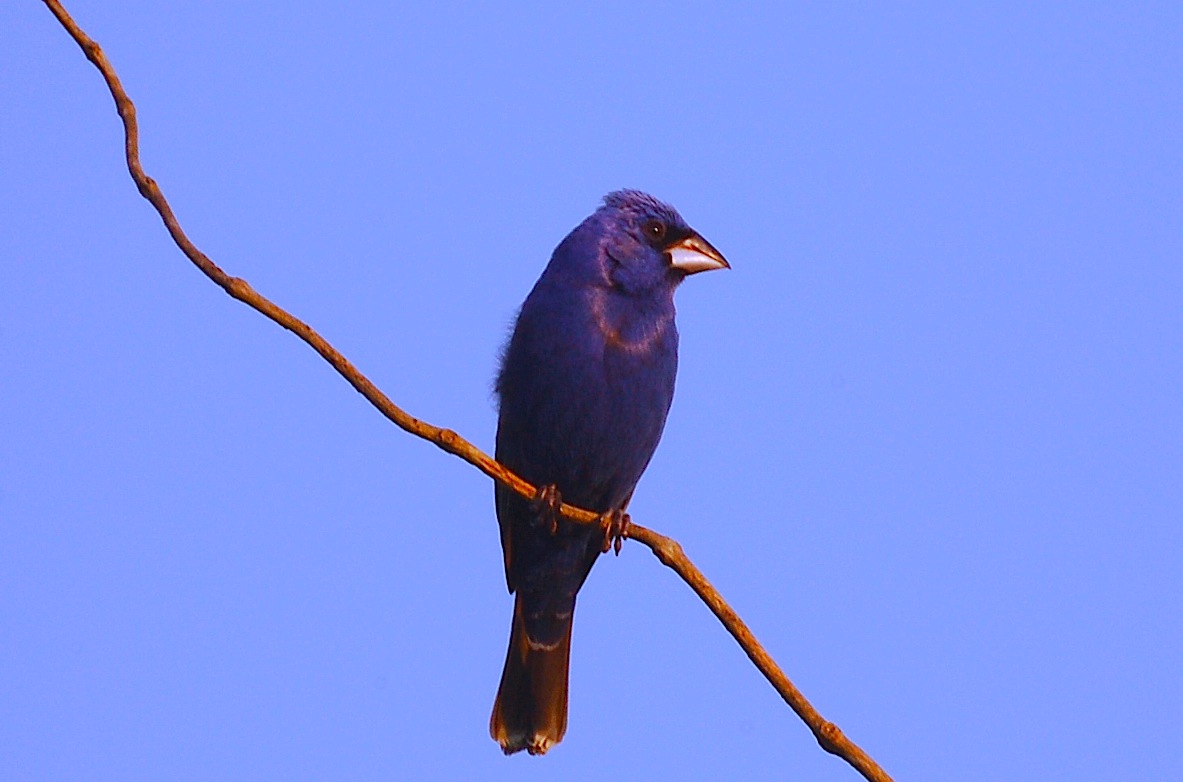
A Canon t-ring ($15) is all
that is needed to attach the 30D to this
telescope. An example image through this
setup is shown below; note that this bird was about 40 or 50 feet from
the camera; through a 400mm lens this bird would have appeared
as little more than a tiny, blue blob in the distance.
Macro Lenses
For flower photography I use a
Sigma 50mm macro lens, which runs a bit
over $200.
The advantage of this lens is that you can photograph objects that are
only millimeters away from the front of the lens. This allows you
to capture minute details such as individual pollen grains or dewdrops
on a flower.
<image>
An example photo through a macro lens is shown below:
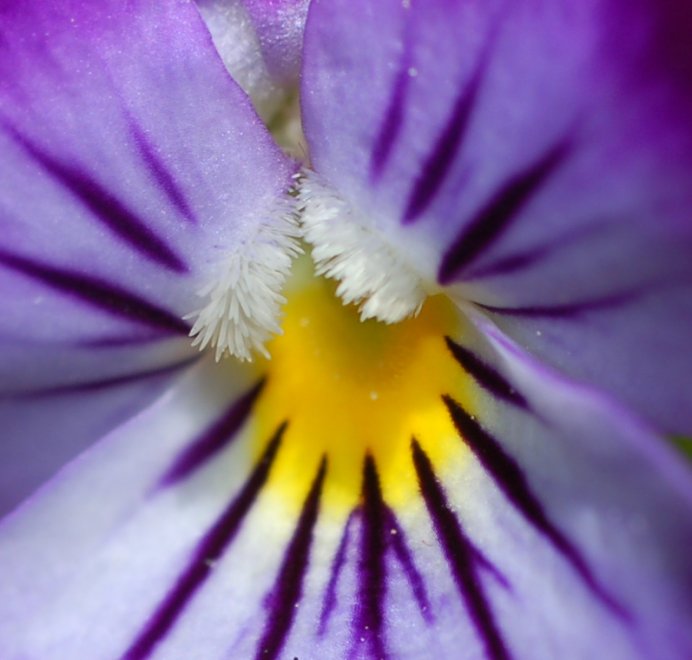
Unlike the situation with bird
photography, with flowers you can get
arbitrarily close, but you need a lens that has a small
"close-focus" distance, or the image will blur when you get too close.
Digital Processing
A final piece of equipment
which has proven extremely valuable is my
Apple Macintosh laptop---a 15-inch Macbook Pro with dual-core Intel
CPU's each running at 2GHz:
<image>
The Macbook Pro comes with
ample image-processing
software
pre-installed, so that for most of my photographic needs, no additional
software is required. Though I've installed Photoshop on my
laptop I rarely use it, opting instead to rely on the handy image
manipulation utilities provided with Mac OS X.
UPDATE: Now that I'm shooting everything in
RAW, the built-in Macintosh software ("Preview") no longer serves my
needs, unfortunately. What I've been doing most recently is using
Canon's free "DPP" software (included on CD-ROM with the camera) to
convert the 12 Mb RAW file into a 60 Mb 16-bit TIFF file that can be
processed by Photoshop. I've had excellent luck in processing my
photos in this way. After processing them in Photoshop Elements
for Mac, I do a screen-capture of the Photoshop image (via Shift-Cmd-4
and a paste into Preview) to a separate TIFF file, then convert the
TIFF files to JPEG using the "sips" program built into Mac OS X.
The temporary 60 Mb TIFF file can be deleted after the JPEG file is
generated, so its size isn't an issue. I sometimes add a final
tweak to the TIFF file using Mac OS X's "Preview" program, though I try
to avoid this. All-in-all, my workflow is now a tiny bit slower
than before, but the improvement in image quality is well worth it.
A $15 USB adapter allows me to
transfer the contents of a
1GB card to the laptop in about 3-4 minutes. Unfortunately, digitally
processing the hundreds of images which can fit on a n8 GB card
takes
rather longer...