|
|
Guitar Lessons #1
Three
Important Patterns
by Bill Majoros
11-19-2003
The most important thing about improvising a solo is knowing where the
notes are on the fretboard. The better you are at envisioning the
locations of the notes on the fretboard, the more fluid and confident
your playing will sound. A significant part of what makes players
like Satriani and Malmsteen sound so expert at improvisation is that
they have nearly instantaneous access to any note in the key, because
they have studied the patterns and have developed an excellent memory
for how those patterns superimpose over regions of the fretboard for a
given key.
I call these patterns the keyspace -- i.e., the positions of
all the notes in a given key on the fretboard.
The first step toward achieving mastery of a keyspace is to learn how
to navigate locally among the notes of a key. I prefer the minor
key for my work, so we will restrict our attention to the minor
keys. The major keys are the same, but with a different root
note, and the hungarian and melodic minor keys can be obtained through
slight modifications. We'll leave these for a future lesson.
Within the minor key there are only three 3-note patterns that occur
over the fretboard. If you can learn to play these 3-note
patterns fast, then you will be able to start shredding the fretboard
by simply playing these patterns one after another at different
positions on the fretboard.
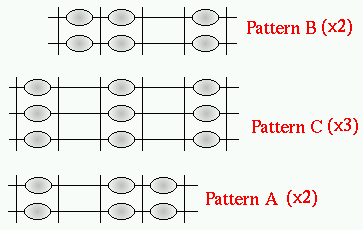
Pattern A
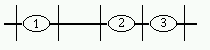 (figure 1) (figure 1)
The first pattern, which I call "Pattern A" is played with the first
(index), third, and fourth (pinky) fingers, as shown above. The
numbers inside the ovals simply represent order -- in this example I'm
playing the lowest note and ascending up the string toward the
right. These diagrams will always represent your view of the
fretboard as you look down on it (assuming you finger with the left
hand and pick with the right -- otherwise, reverse the image
left-to-right).
In the diagram above, the '1' oval marks the root note of the minor
scale, as you will see. It is the most important note of the
scale (in the usual mode), and is the one to which you should always
retreat if you get lost.
Pattern B
 (figure 2) (figure 2)
The second pattern, Pattern B, is shown above. The greyed oval
marks the root note, which is what you played with your index finger
when you played pattern A. To play Pattern B, slide your hand up
two frets and then finger the pattern as shown, with first (index)
finger, second (middle) finger, and pinky.
This seems very basic, but I'll show you how to do some wicked things
with these patterns later. For now, let's move right along to the
third pattern.
Pattern C
 (figure 3) (figure 3)
Pattern C occurs above (to the right of, on the fretboard) Patterns A
and B. The greyed out ovals show the first two notes of Pattern
A. The greyed oval on the right is the note you played with your
index
finger in Pattern B. To play Pattern C, simply slide your hand up
one fret (to the right) and put your index finger where your middle
finger had been for Pattern B. Now place your index finger,
middle finger and pinky on the fretboard in the '1', '2', and '3'
positions as shown. This is Pattern C.
Now comes an amazing fact: the entire minor key -- its entire keyspace
--
consists of repeated occurrences of these three patterns.
Consider the following:

(figure 4)
All I have done here is I have taken the figure (3) above for Pattern C
and
continued superingposing the three patterns in a specific order until I
had covered twelve frets -- and twelve is a special number by the way,
as you notice from the dots at the twelfth fret of your guitar (unless,
of course, you've got one of those clever necks with no dots).
Twelve semitones (frets) make up an octave. So the diagram above
covers one octave, from the root note of the minor key up to the next
root above it. The way we went from one root to its octave was by
applying the three patterns in succession: ABCABC.
You can see this more clearly in figure 5, where I have duplicated
figure 4 four times and highlighted the patterns with red boxes.
(These four tracks do not represent four strings, by the
way -- I just
duplicated the diagram for one string so that I wouldn't have to draw
all those red boxes on the same string all at once -- that would be
hard to read).
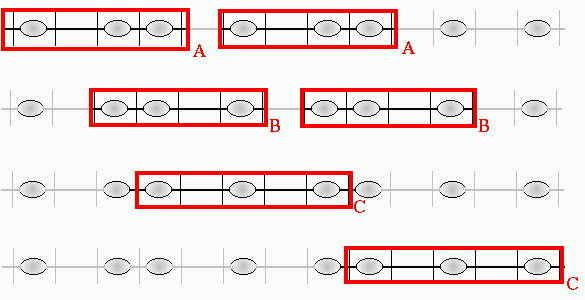
(figure 5)
However, after that last Pattern C comes another Pattern C before we
can start the whole succession again. If you had an enormously
long fretboard you could play a succession of minor scales on a single
string by playing the following patterns while moving progressively up
the fretboard:
ABCABCCABCABCCABCABCCABCABCCABCABCCABCABCCABCABCC...
I've underlined the duplicated C's here, just to point out that they do
represent a slight irregularity in the sequence. (and note that I
don't mean the notes A, B, and C, but the patterns
A, B, and C, as I defined them above).
The secret to improvising in the minor key is to learn how these three
patterns repeat endlessly over the fretboard. I have just shown
you how they repeat horizontally along the length of a single string,
but now we must consider how they occur vertically -- something of
potentially greater practical value, because knowing this will allow
you to play long scales very rapidly at a single position on the neck
(i.e., without having to slide your hand up and down the neck, which
can be difficult to do with great precision when you're playing fast).
Consider figure 6, below:
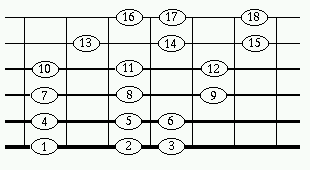
(figure 6)
Whoa! That's a lot of notes. And it doesn't look very
orderly. Not the type of thing you'd figure would be easy to
memorize. But it's a lot easier than it looks.
What I have done to produce this figure is to move from the low E
string up to the high E string while applying the following sequence of
patterns: AACCCB. You can see this by looking at figure 7.
In figure 7 I have duplicated the fretboard just for convenience, and
put red rectangles around each of the patterns. Putting all the
red rectangles on the fretboard at once looks confusing, so just look
back and forth at the two fretboards and you should see that all notes
are accounted for by one of the three patterns.
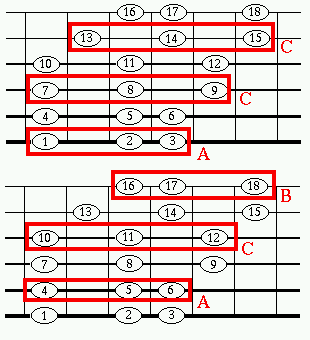
(figure 7)
An interesting thing that you'll note is that there are three Pattern
C's in this figure, and only two Pattern A's and one Pattern B.
In
truth, if your guitar had a seventh string beyond your high 'E' string
you could continue onto that string, and then (if it was tuned right)
you'd play another Pattern B. That's because Pattern A's come in
twos, and Pattern B's come in twos, too.
But Pattern C comes in threes. Why? Who knows.
Anyway, an easier way to remember the way these patterns join together
is shown schematically in figure 8:
(figure 8)
This diagram illustrates not only that Patterns A and B come in twos
and that Pattern C comes in threes, but also that when playing
vertically (across the strings), Pattern C falls between Patterns
A and B. This was also evident in figure 3.
But there is something else that this figure shows a little more
clearly than figure 7, and that is that Pattern B sits one fret higher
on the fretboard than Pattern C. In general, when you are in the
heat of a raging solo and you find yourself ascending through a scale
consisting of two Pattern A's, the next pattern will be Pattern C,
which will (in general -- we'll see an exception in a moment) align
with Pattern A on it's left edge, so that you needn't slide your hand
up or down the fretboard -- your index finger just moves to the next
string without moving left or right. However, when moving from
Pattern C to Pattern B, you must slide up the fretboard by one
fret before playing Pattern B.
This is what I call the C/B rift. The C/B rift occurs
only between patterns C and B. If you are ascending from a
Pattern C on one string to a Pattern B on the other, you must be
prepared (except in the case I'm going to tell you about in just a
second) to slide up one fret. Conversely, if you are playing a
descending scale, then when you move from a Pattern B on one string to
a Pattern C on the next lower string, you must slide down one
fret. Such a rift does not occur between any of the other pairs
of patterns.
There is one exception to the above rules, and that is the transition
between the G and B strings. These are the third string
from the bottom (third thinnest) and the second string from the bottom
(second thinnest). As you probably already know from tuning your
guitar by ear, the number of half-tones between the G and B
strings is less than that between all the other adjacent pairs of
strings. Normally you can tune your guitar by ear by playing one
string at the 5th fret and playing the next higher string open, and
these should be at the same pitch. But when you tune your B
string you instead place your finger on the fourth fret of the
G-string,
not the fifth. I call
this the B-string tuning anomaly.
To get a feel for what the B-string tuning anomaly means in
practice, look again at this figure which I showed you before:
(figure 6)
Now, if you look again at figure 8 you'll see that the three Pattern
C's are supposed to line up, so that your index, middle, and pinky
fingers stay at the same frets when moving from one Pattern C to the
next. But in figure 6 we have three Pattern C's (7-8-9, 10-11-12,
and 13-14-15) which do not align properly. The first two align,
but the third one, because it occurs on the B-string, is shifted up
one fret. That is just as we would expect from the B-string
tuning anomaly. If it weren't for that tuning anomaly, figure
6
would look much simpler, with nearly everything aligning neatly, like
in figure 8. The B-string tuning anomaly is just
something we have to live with (unless you get clever and retune your
guitar...). The tuning anomaly gets especially bothersome when it
occurs in conjunction with the C/B rift, because then both
phenomena introduce a single-fret shift when going from pattern C to
Pattern B, so that you then have to shift up two frets before
playing the B pattern.
Fortunately, the patterns A, B, and C, together with the C/B rift
and the B-string tuning anomaly, account for everything you
need to know about the minor keyspace. Once you have this small
set of rules firmly in mind you are ready to explore the fretboard on
your own, which is the only way to develop a strong mental map of the
keyspace.
If you haven't already mastered the keyspace (the set of all notes in a
particular key and where they occur on your fretboard), then I
recommend the following exercise to help you develop your mental map of
the fretboard:
Pick a random note anywhere on the fretboard, on any string.
Call this the root note, and hold it for several seconds so your
ears
acclimate to hearing it as the root. Now, play an ascending scale
by using Pattern A rooted at this note, then moving on to the next
higher string, playing Pattern A again (because Pattern A occurs in
twos,
remember), then playing three Pattern C's, etc., until you run out of
strings
in that direction. You must keep the C/B rift in mind if
you transition from Pattern C to Pattern B before running out of
strings, and when transitioning from the G string to the B string you
must apply the B-string tuning anomaly by shifting up one fret.
Now turn your fingers around (metaphorically speaking) and descend back
through the scale in reverse, until you return to the root note which
you randomly chose, and then without stopping continue on to the lower
strings by transitioning from that first Pattern A to a Pattern B, then
to another Pattern B, and then to the highest of the three Pattern C's
(applying the C/B rift!), until you run out of strings in that
direction.
Repeat this process many times, random choosing a root note, and then
cycling through the A/C/B/A/C/B/... patterns. Doing this will
help you not only to develop a sense for the fretboard and the
keyspace, but will also attune your ears to the minor scale. When
you have begun to feel comfortable with this exercise, you can extend
it by sliding up one or two frets (as appropriate, according to figure
4) whenever you reach the highest or lowest string and continuing then
in the opposite direction in the new position.
You should eventually get good enough at this exercise to be able to
start at any note on the fretboard and, through a series of
A/C/B/A/C/B... transitions and position slides, move to any other note
on the fretboard. If you are a beginner, then this will take
several weeks at least, but it is well worth the effort.
 ©2003
Bill Majoros.
All rights reserved. ©2003
Bill Majoros.
All rights reserved.
|
|
|