|
|
Guitar Lessons #3
Sweeping
Arpeggios
by Bill Majoros
11-27-2003
In the previous column I showed how a "micro-sweep" picking strategy
can be used to play fully-picked scales very rapidly and with a minimum
of effort. These micro-sweeps consisted of a single
picking stroke that swept through two strings, thereby playing two
notes with one movement. In this week's column I will show how
you can extend such a sweeping technique to play across up to six
strings in a single sweep. When done properly this technique can
sound very impressive, and has been used effectively by many players
including Yngwie Malmsteen and Joe Satriani, to name just two.
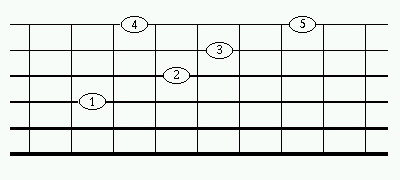
We will begin with a very simple pattern, shown below:
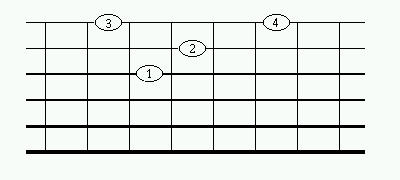
(figure 1)
Recall from my previous lessons that this diagram represents an
anonymous section of freboard, and that the numbers inside the ovals
represent the order in which the notes are to be played -- the numbers
do not represent fingerings.
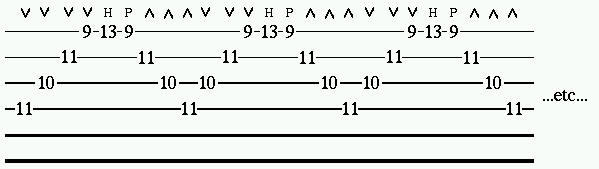
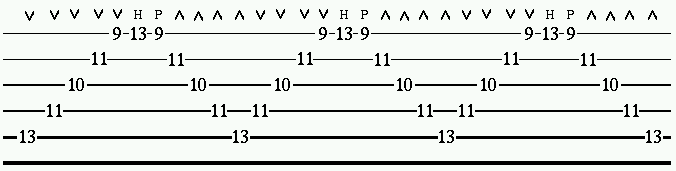
The figure below shows how to pick this pattern:
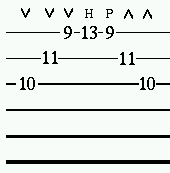
(figure 2)
Recall that in this tab notation, the numbers represent fret positions,
and the line of v's, ^'s, H's, and P's tell you how to pick each
note. A 'v' means to down-pick, a '^' means to up-pick, an 'H'
means to hammer-on (or slam your fretting finger into the string
without picking it), and a 'P' means to pull-off (or twang the string
by pulling away the finger on the higher note so that the lower note
sounds without having to pick it).
In the figure above I have shown you how I play this particular
sweeping pattern: I down-pick the first three notes with a single
picking stroke, then hammer on with my pinky at the 13th fret, pull-off
to my index finger at the 9th fret, and then up-pick the remaining two
notes with a single picking stroke. The notes marked '10' I play
with my index finger and the notes marked '11' I play with my middle
finger. When you get to the end of this pattern you can repeat it as
follows:
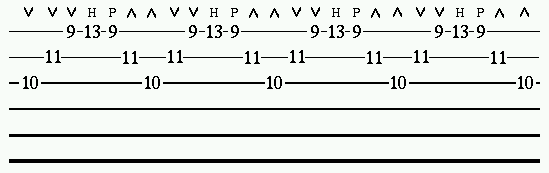
(figure 3)
You should play this pattern very slowly at first, concentrating on
accuracy rather than speed. The individual notes should come at
steady, regular intervals, and should be played with a uniform
tone. Only when you can do this well should you increase your
speed. Eventually you should be able to play this pattern many
times over very rapidly, and the result should sound fairly impressive
(if a bit repetitive).
The next step is to add a new note to the sequence to make the arpeggio
longer. The figure below shows the same pattern with a new note
added on the D-string. I play this note with my middle
finger. The new note is marked '1' in the figure below:
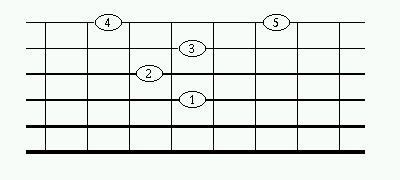
(figure 4)
As with the shorter version of the arpeggio, you can chain these
patterns together into one long sequence:
(figure 5)
As before, I recommend playing this very slowly at first. This is
actually one of my warm-up exercises. I always start playing it
very slowly, then speed up very gradually until I can play it smoothly
with great speed. Note again that the 'v v v' and the '^ ^ ^'
sequences shown along the top of the tab indicate single down or up
strokes, not three separate picking motions. It is this
consolidation of separate notes into a single stroke that is referred
to as sweeping, and it will allow you to play sequences like
the one shown above very rapidly.
In figure 6 I finally complete the pattern by adding one more note, on
the A-string:
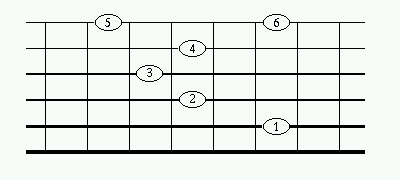
(figure 6)
This new note I play with my pinky. In figure 6 I labelled it '1'
to indicate that it should be played as the first note in the arpeggio,
though in practice it is sometimes useful to start on one of the higher
notes and sweep the arpeggio down (with an up-stroke) toward the lower
strings.
(figure 7)
Now that you have the hang of sweeping arpeggios I will show you two
others that I often use. The first is shown in figure 8, below:
(figure 8)
I generally don't play the note on the low E-string (the one marked
'1'), but sometimes I add it in there, and it doesn't hurt to practice
this pattern with the notes on all six strings, because it will help
you develop your sweeping technique. However, it is also very
useful to insert smaller portions of this or other sweeps into your
solos, so you should also practice playing just the notes marked
{4,5,6,7} as a continuous sweep, and then the pattern {3,4,5,6,7}, and
{2,3,4,5,6,7}. Obviously, you can repeat the whole arpeggio, up
and down and up and down again several times very rapidly, and that
usually sounds pretty nice.
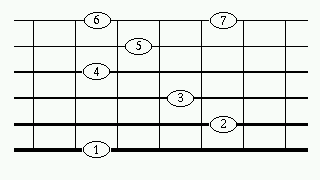
The other arpeggio I often use is shown below in figure 9. Some
guy named Chris Hafler showed me this in 1989 when my band was
practicing in a filthy little room in the corner of a plunger
factory. I think Chris borrowed it from George Lynch.
Anyway, it is very obvious, because the notes marked 1, 2, and 3 make
up a very popular chord in heavy metal music:
(figure 9)
In fact, this arpeggio sounds almost exactly like the one I showed you
in figure 6, but with one fewer note, so if this one is easier for you
to play, you might just use this one rather than the other one, but it
is still nice to know them both.
As a final exercise, I direct your attention to the fretboard shown in
figure 10. This figure is a very, very useful one, because it
shows you the minor keyspace over a large portion of the
fretboard. As usual, I haven't given you any fret numbers,
because you can slide this template up and down the fretboard as
necessary to fit the specific key you're using. The notes marked
in red are the root notes -- if you ever get lost while improvising, it
is always safe to retreat to one of these notes (as long as the key
doesn't change...), and they are also generally a good place to begin a
solo, or even to begin your explorations of the fretboard when you're
practicing.
|
|
The minor
keyspace and its roots (in red):

(figure 10)
|
|
Looking at the figure above you should be able to find multiple
instances of each of the arpeggios I've shown you. In fact, a
good
exercise is to put your pinky on a note on the A-string, play the
appropriate arpeggio (selected from the first two above), and then
slide your pinky up the fretboard to the next note on the A-string and
play the appropriate arpeggio in that position. There's actually
one
more pattern which I haven't shown you that you would need in order to
do this exercise. It is shown in blue in the figure below:
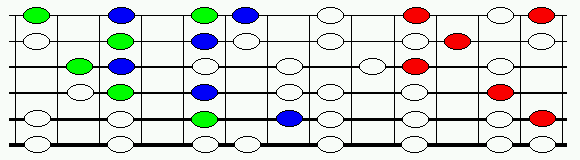
(figure 11)
You can see that it is very similar in shape to the other two 5-note
arpeggios that I've already shown you, which are shown in green and
red. With these three patterns in your arsenal, you should be
able
to play a 5-string arpeggio at any valid position along the
A-string. This is very nice for when you're improvising a solo,
although it will take some practice for you to develop a sense for
which arpeggio is appropriate at each position. I can usually
tell by ear while I'm playing, but it's also possible to memorize the
sequence of these patterns up and down the fretboard.
When you've mastered all the arpeggios in this lesson you can begin to
invent your own by tracing out novel patterns of notes in figure
10. The
trick is to try to pick notes on adjacent strings which are close
together but not on the same fret. If you try to sweep two notes
which
are on the same fret you'll either have to bar the notes by laying a
finger lengthwise across the strings (which usually sounds a bit sloppy
for me), or try to cram two or more fingers into the same fret, which
can be awkward, so I try to avoid notes on the same fret.
A nice effect is to mute some or all of the strings with your palm
while playing an arpeggio. These subtle nuances will come to you
as you get better at sweeping arpeggios, and will eventually help you
to combine these techniques into your own distinctive style.
 ©2003 Bill
Majoros.
All rights reserved. ©2003 Bill
Majoros.
All rights reserved.
|
|